WordPress 博客迁移
Step 1. 备份数据库
输入命令导出数据库
mysqldump -u root -p --opt --all-databases -r backup.sql这里 -u 指定用户名。-p 是指定密码,可以把密码跟在 -p 后面,注意不能有空格,也可以留空,之后会提示输入数据库密码。--opt 是一些选项的简写,主要是为了快速导出数据库。--all-databases 选择导出所有数据库。-r 设置导出文件名。关于 mysqldump 的具体参数设置可以看 mysqldump(1)。
将导出的数据库下载到本地。
Step 2. 备份站点数据
站点数据位于 /www/wwwroot 目录下,默认目录名为 wordpress/。输入命令将目录打包
tar -czvf wordpress.tar.gz wordpress/这里 -c 指创建一个新的归档文件。-z 指使用 gzip 进行压缩。-v 指在归档过程中详细列出正在处理的文件。-f 指定文件名。关于 tar 的具体参数设置可以看 tar(1)
将打包好的站点数据下载到本地。
Step 3. 在新服务器上安装 LNMP
这里以 Unbuntu 为例
Step 3.1 安装 Nginx
输入命令
sudo apt update
sudo apt -y install nginx
安装完毕之后输入命令查看 nginx 版本,以检查是否安装成功
nginx -vStep 3.2 安装 MySQL
安装 MySQL
输入命令sudo apt -y install mysql-server安装完毕之后输入命令查看 MySQL 版本,以检查是否安装成功
mysql -V配置 MySQL
输入命令sudo mysql输入语句设置 root 用户密码
ALTER USER 'root'@'localhost' IDENTIFIED WITH mysql_native_password by 'mynewpassword';之后输入
exit;退出数据库
对 MySQL 进行安全性设置
输入命令
sudo mysql_secure_installation之后输入 root 用户的密码
root@VM-12-15-ubuntu:/# sudo mysql_secure_installation

Securing the MySQL server deployment.

Enter password for user root:
然后是设置密码验证功能,这个功能会检查密码的强度,并只允许使用高强度的密码,输入
Y启用VALIDATE PASSWORD COMPONENT can be used to test passwords and improve security. It checks the strength of password and allows the users to set only those passwords which are secure enough. Would you like to setup VALIDATE PASSWORD component? Press y|Y for Yes, any other key for No:然后是选择密码强度,这里输入
2选择最高的密码强度There are three levels of password validation policy: LOW Length >= 8 MEDIUM Length >= 8, numeric, mixed case, and special characters STRONG Length >= 8, numeric, mixed case, special characters and dictionary file Please enter 0 = LOW, 1 = MEDIUM and 2 = STRONG:然后会询问是否需要修改 root 用户密码,由于我们一开始设置的就是高强度密码,所以这里输入
N不修改密码Estimated strength of the password: 100 Change the password for root ? ((Press y|Y for Yes, any other key for No) :然后会询问是否删除 MySQL 安装时自带的匿名用户,这里输入
Y删除匿名用户By default, a MySQL installation has an anonymous user, allowing anyone to log into MySQL without having to have a user account created for them. This is intended only for testing, and to make the installation go a bit smoother. You should remove them before moving into a production environment. Remove anonymous users? (Press y|Y for Yes, any other key for No) :然后会询问是否禁用数据库远程登录,这里输入
Y禁用远程登录,我们只需要通过 ssh 登录云服务器或者通过 phpMyAdmin 来管理数据库就可以了,不需要远程登录Normally, root should only be allowed to connect from 'localhost'. This ensures that someone cannot guess at the root password from the network. Disallow root login remotely? (Press y|Y for Yes, any other key for No) :然后会询问是否删除 test 数据库,输入
Y删除By default, MySQL comes with a database named 'test' that anyone can access. This is also intended only for testing, and should be removed before moving into a production environment. Remove test database and access to it? (Press y|Y for Yes, any other key for No) :接下来输入
Y使上述配置立即生效Reloading the privilege tables will ensure that all changes made so far will take effect immediately. Reload privilege tables now? (Press y|Y for Yes, any other key for No) :最后登录数据库测试一下,输入命令
sudo mysql -uroot -p输入密码,登录成功之后有如下输出
Welcome to the MySQL monitor.  Commands end with ; or \g.
Your MySQL connection id is 14
Server version: 8.0.40-0ubuntu0.24.04.1 (Ubuntu)

Copyright (c) 2000, 2024, Oracle and/or its affiliates.

Oracle is a registered trademark of Oracle Corporation and/or its
affiliates. Other names may be trademarks of their respective
owners.

Type 'help;' or '\h' for help. Type '\c' to clear the current input statement.
输入
exit;退出数据库
Step 3.3 安装 PHP
安装 PHP
输入命令sudo apt -y install php-fpm安装完成后输入命令查看 PHP 版本,以检查是否安装成功
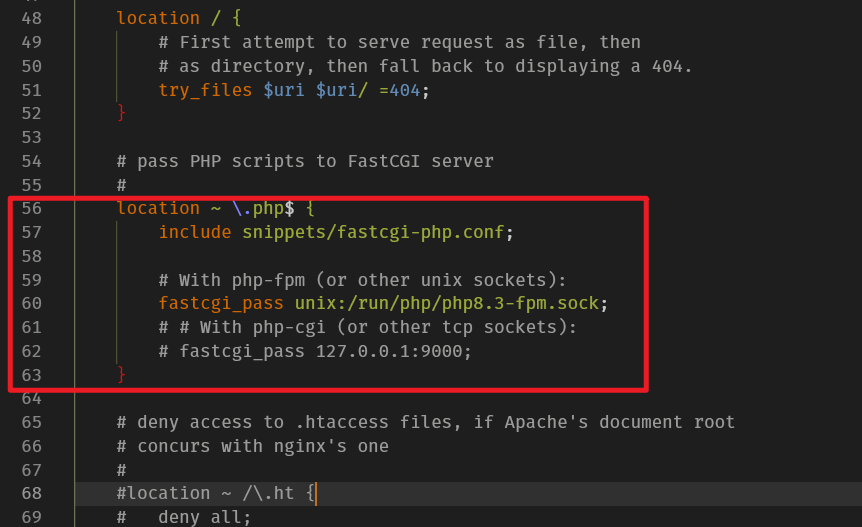
php -v修改 Nginx 配置文件以支持 PHP
重启 Nginx 服务
输入命令sudo systemctl restart nginx.service在Nginx网站根目录中,新建
phpinfo.php文件
从 Nginx 默认配置文件/etc/nginx/sites-enabled/default中得知,网站根目录位于/var/www/html

phpinfo.php文件内容为保存退出
访问
http://{服务器IP地址}/phpinfo.php能看到 PHP 的安装信息就说明成功了输入命令删除
phpinfo.php文件sudo rm -rf /var/www/html/phpinfo.php
Step 3.4 安装 phpMyAdmin
安装 phpMyAdmin
输入命令sudo apt install phpmyadmin选择 Web 服务器,这里只提供 apache2 和 lighthttpd, 我们使用的是 Nginx,所以这里随便选一个

由于我们使用的 Web 服务器是 Nginx,我们需要建立一个符号链接让 Nginx 能够找到 phpMyAdmin 的目录,输入命令
sudo ln -s /usr/share/phpmyadmin /var/www/html/phpmyadmin访问
http://{服务器IP地址}/phpmyadmin/,输入用户名密码就可以使用 phpMyAdmin 管理 MySQL 数据库了为了安全起见,我们需要修改 phpMyAdmin 的默认登录地址,可以通过重命名符号链接来做到这一点,输入命令
mv phpmyadmin newurl然后就只能通过
http://{服务器IP地址}/newurl/访问 phpMyadmin 了
Step 4. 导入数据库
输入命令
mysql -u root -p输入密码后进入 mysql,然后输入语句导入数据库
source backup.sql;输入
exit;退出 mysql
Step 4. 安装 WordPress
将之前打包好的站点数据 wordpress.tar.gz 上传到新的网站根目录 /var/www/html 下并解压
tar -xzf wordpress.tar.gz 这里 -x 指的是从归档文件中提取,-z 指的是用 gzip 对文件进行解压,对应 .gz 后缀的文件,-f 指定文件名。关于 tar 的具体参数设置可以看 tar(1)
接下来需要在 Nginx 中新建一个站点,在 /etc/nginx/sites-available 目录下新建一个配置文件 xgjuice.top,内容如下:
server {
    listen 80;
    listen [::]:80;

    server_name xgjuice.top www.xgjuice.top;
    root /var/www/html/wordpress;
    index index.php;

    location / {
        try_files $uri $uri/ /index.php?$args;
    }

    location ~ \.php$ {
        include snippets/fastcgi-php.conf;
        fastcgi_pass unix:/var/run/php/php8.3-fpm.sock;
    }

    location ~ /\.ht {
        deny all;
    }
}
然后再向目录 /etc/nginx/sites-enabled 建立符号链接
ln -s /etc/nginx/sites-available/xgjuice.top /etc/nginx/sites-enabled/然后输入
nginx -s reload重载 nginx 配置,即可通过域名访问网站了
Step 5. 配置 https
现在的免费 SSL 证书有效期只有 90 天了,需要经常换证书,手动配置的话非常麻烦,推荐使用 httpsok 进行自动续签
首先我们编辑 nginx 配置文件 /etc/nginx/sites-available/xgjuice.top,配置 https
在原来的配置上加上以下内容:
listen  443 ssl;
server_name xgjuice.top;
rewrite ^(.*)$ https://$host$1 permanent;

ssl_certificate certs/xgjuice.top.pem;
ssl_certificate_key certs/xgjuice.top.key;

ssl_session_timeout 5m;
ssl_protocols TLSv1.1 TLSv1.2 TLSv1.3;
ssl_ciphers EECDH+CHACHA20:EECDH+AES128:RSA+AES128:EECDH+AES256:RSA+AES256:EECDH+3DES:RSA+3DES:!MD5;
ssl_prefer_server_ciphers on;
add_header Strict-Transport-Security "max-age=31536000";
修改后的配置文件如下:
server {
    listen 80;
    listen 443 ssl;
    listen [::]:80;

    server_name xgjuice.top www.xgjuice.top;
    root /var/www/html/wordpress;
    index index.php;

    # http 重定向
    rewrite ^(.*)$ https://$host$1 permanent;

    # 设置ssl证书文件路径
    ssl_certificate certs/xgjuice.top.pem;
    ssl_certificate_key certs/xgjuice.top.key;

    ssl_session_timeout 5m;
    ssl_protocols TLSv1.1 TLSv1.2 TLSv1.3;
    ssl_ciphers EECDH+CHACHA20:EECDH+AES128:RSA+AES128:EECDH+AES256:RSA+AES256:EECDH+3DES:RSA+3DES:!MD5;
    ssl_prefer_server_ciphers on;
    add_header Strict-Transport-Security "max-age=31536000";

    # 访问日志
    access_log /var/log/nginx/xgjuice.top.https.log;

    location / {
        try_files $uri $uri/ /index.php?$args;
    }

    location ~ \.php$ {
        include snippets/fastcgi-php.conf;
        fastcgi_pass unix:/var/run/php/php8.3-fpm.sock;
    }

    location ~ /\.ht {
        deny all;
    }
}
然后输入
nginx -s reload重载 nginx 配置
最后在 httpsok 上申请证书,然后复制自动配置脚本,执行即可完成 SSL 证书的部署和自动续签
Step 6. 修改目录所有者
由于是通过 ssh 上传的 wordpress 目录,这会导致目录的所有者与运行 php 和 nginx 的用户不同,这会导致无法在 wordpress 里上传文件,会遇到 无法将上传的文件移动至 wp-content/uploads/2024/11 的错误
从 /etc/nginx/nginx.conf 里可以看到,运行 nginx 的用户是 www-data
而 wordpress 的所有者却不是:
所以我们需要将 wordpress 的所有者改为 www-data,运行如下命令即可解决问题
chown -R www-data /var/www/html/wordpress


Comments | 1 条评论
确实,俊工最帅,俊工最强,俊工是oppo的主,是memory的王,他做的每一次决策都无比正确,他解的每一单都闪闪发光,他的每一次代码走读都是布施的圣火,他的每一个zwriteip都是希望的光芒。俊工,你永远不会犯错,因为memory的定义由你来谱写;